Policies
Overview
Section titled “Overview”Policies are the rules that tell Transpeye what to look for in your transaction and event data, and what actions to take when a match is found. Every alert raised in the system is the result of a policy matching an incoming event. Policies are configured at the account level and apply to all data received by Transpeye for your account.
The Policies page at /policies is found under Setup in the navigation bar. You need setup-level user permissions to access it. From this page you can create new policies, enable or disable existing ones, change their precedence order, and delete policies you no longer need.
Step-by-Step Guide
Section titled “Step-by-Step Guide”Step 1: Open the Policies Page
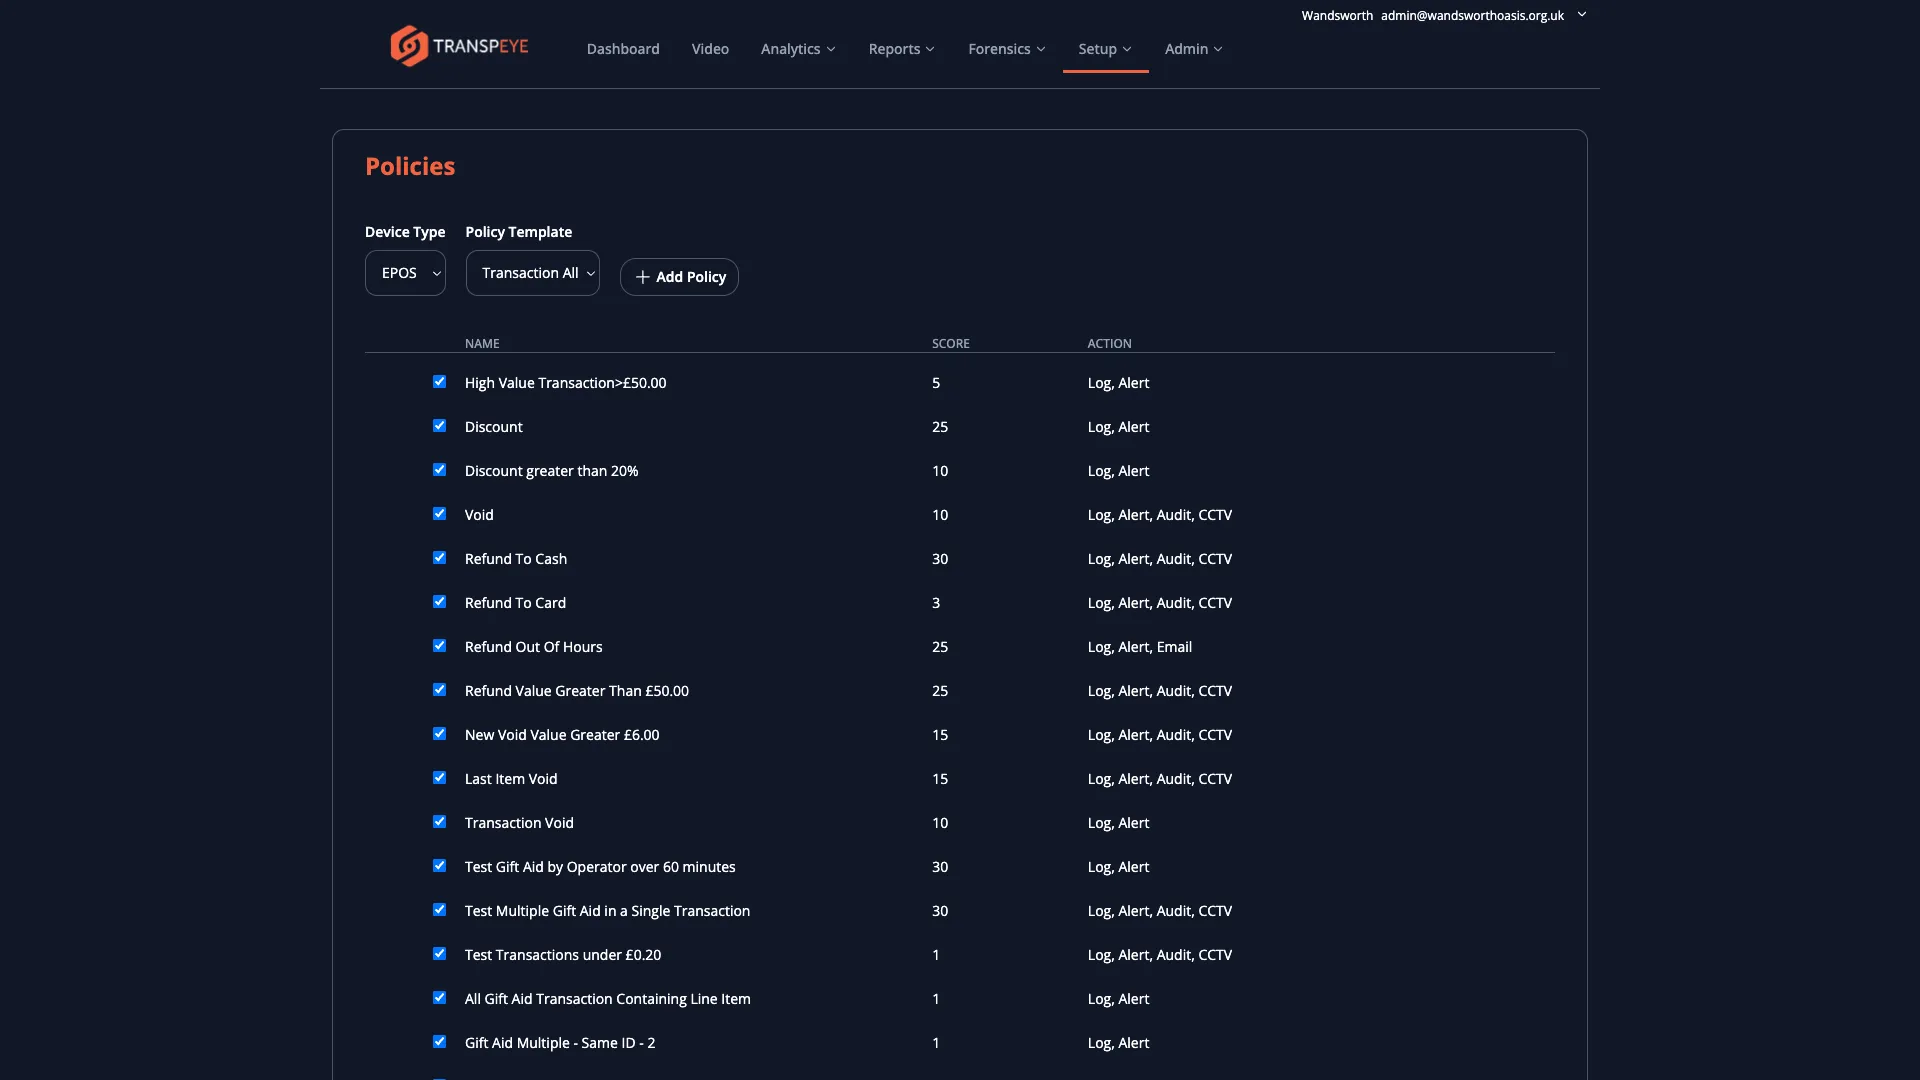
Section titled “Step 1: Open the Policies Page”In the navigation bar, click Setup, then click Policies. The policies list loads, showing all policies configured for your account.
Step 2: Understand the Policy List
Section titled “Step 2: Understand the Policy List”Each row in the policies list represents a single policy. The columns are:
| Column | Description |
|---|---|
| Enabled | A checkbox that indicates whether the policy is currently active. Unchecked means the policy is disabled and will not trigger alerts. |
| Name | The name of the policy as configured |
| Score | The risk score assigned to alerts generated by this policy. Higher scores indicate greater severity. |
| Action | A text summary of the actions the policy will take when triggered (for example, “Log and Alert, Email, CCTV Video”) |
Step 3: Enable or Disable a Policy
Section titled “Step 3: Enable or Disable a Policy”To enable a policy, check the checkbox at the left of its row. To disable it, uncheck the checkbox. The change takes effect immediately without needing to save. Disabled policies remain in the list but do not process incoming data until re-enabled.
Use this to temporarily suspend a policy during maintenance periods or to test changes without permanently deleting the policy.
Step 4: Reorder Policies (Set Precedence)
Section titled “Step 4: Reorder Policies (Set Precedence)”The order of policies in the list determines their precedence — policies higher in the list are evaluated first. When Transpeye processes an incoming event, it works through the enabled policies in order from top to bottom.
To reorder a policy, use the up and down arrow buttons that appear when you hover over a policy row. Click the up arrow to move the policy one position higher (greater precedence), or the down arrow to move it one position lower.
You can also drag and drop policies to reorder them. Click and hold the policy row, drag it to the desired position, and release.
Step 5: Create a New Policy
Section titled “Step 5: Create a New Policy”To create a new policy:
-
Select a Device Type from the dropdown at the top of the policies page. Device types include:
- EPOS — policies that apply to point-of-sale transaction data (discounts, refunds, voids, out-of-hours transactions)
- Camera — policies that apply to video analytics events from cameras
- Physical Security — policies that apply to alarm events
- Access Control — policies that apply to door and entry events
- Till Events — policies that apply to low-level till hardware events
-
Select a Policy Template from the second dropdown. The available templates change depending on the selected device type. Common EPOS templates include:
- Discount (matches transactions containing a discount above a threshold)
- Refund (matches refund transactions)
- Void (matches voided transactions)
- Out of Hours (matches transactions that occur outside configured store opening hours)
-
Click “Add Policy”. Transpeye creates the policy using the selected template and opens it in the policy editor. Configure the policy conditions and actions as described in the steps below.
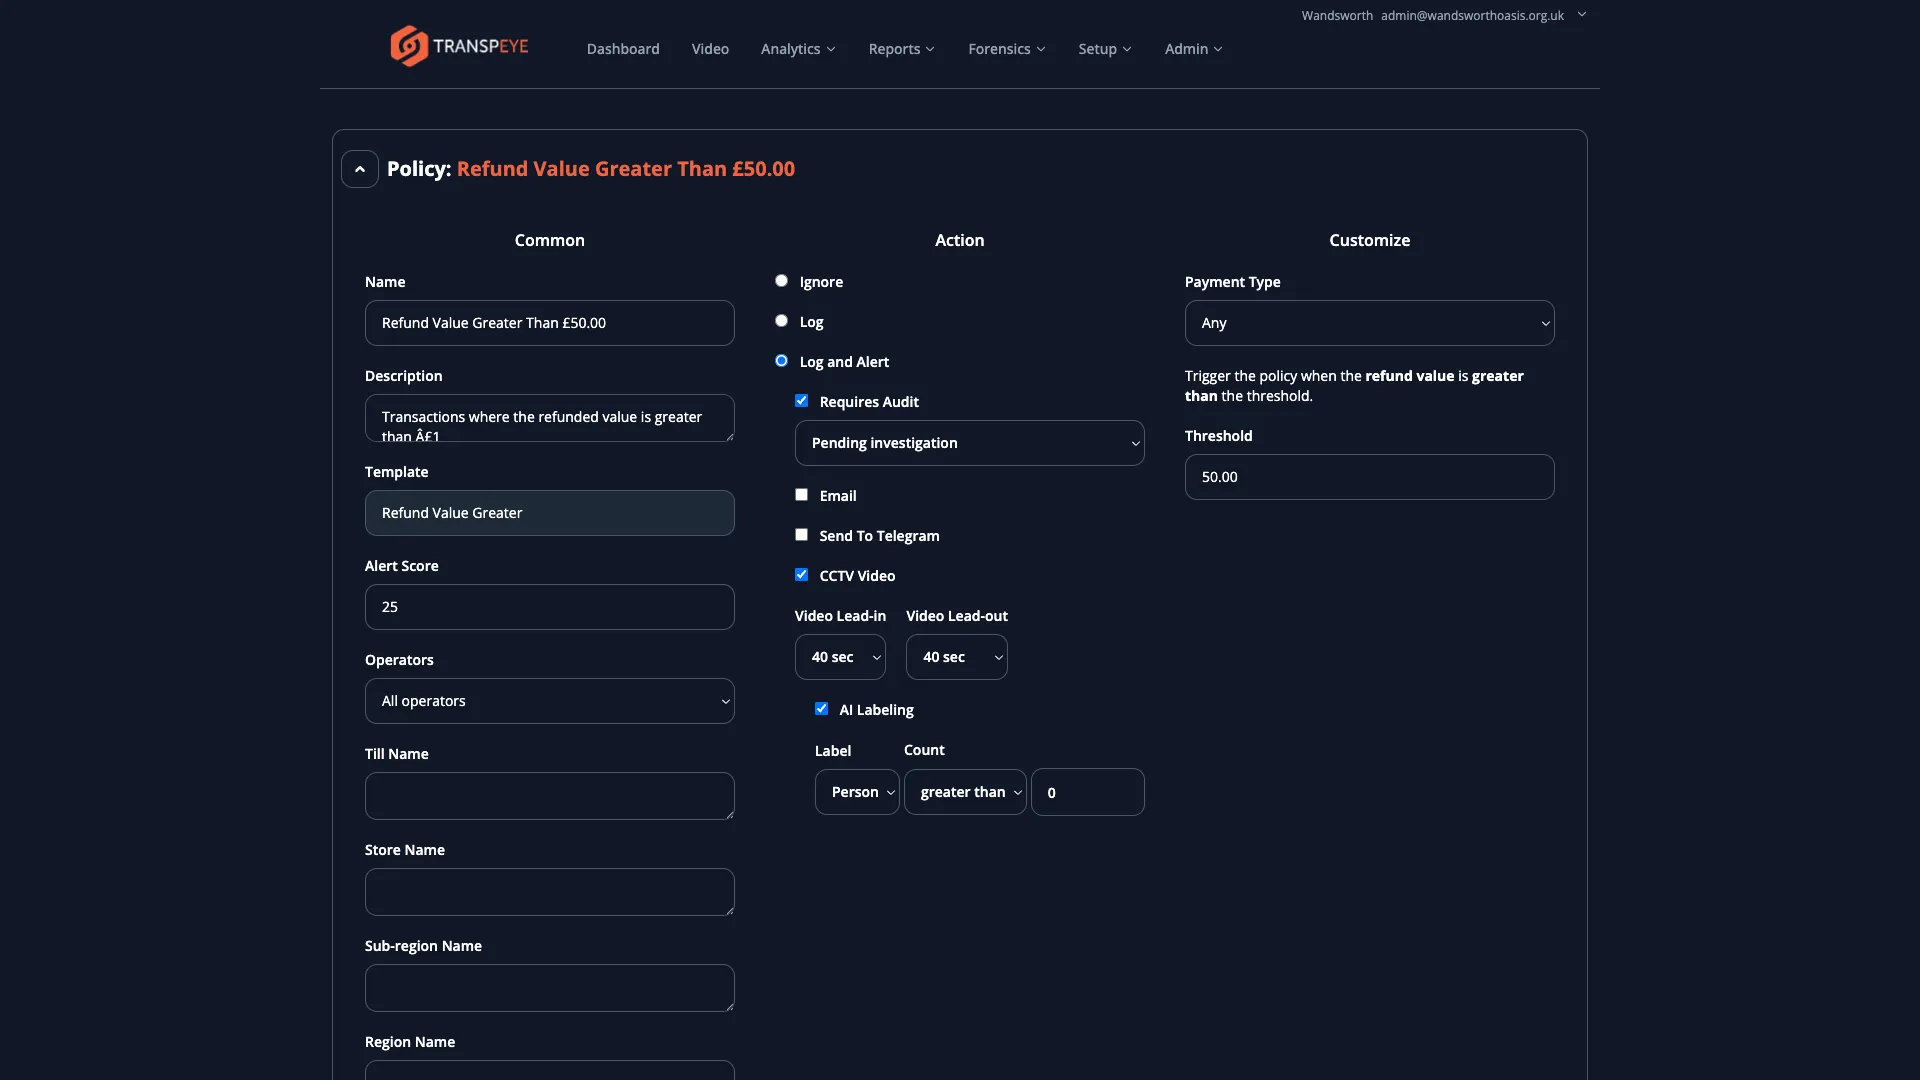
Step 6: Configure Policy Conditions
Section titled “Step 6: Configure Policy Conditions”When the policy editor opens, you can configure the conditions that must be true for the policy to match an event. The available condition options depend on the policy template. Common conditions include:
| Condition | Description |
|---|---|
| Amount threshold | The minimum or maximum transaction value, discount amount, refund amount, or void amount required to trigger the policy (for example, “Discount greater than £10.00”) |
| Time range | Restrict the policy to events that occur within or outside specific hours (for example, “Outside 09:00–18:00”) or outside the configured store opening hours |
| Operator filter | Restrict the policy to events involving a specific operator or group of operators |
| Device filter | Restrict the policy to events from a specific till, camera, or device |
| Discount type | For discount policies, specify whether the policy applies to customer discounts, staff discounts, or both |
Enter your condition values in the form fields provided and proceed to configure the policy actions.
Step 7: Configure Policy Actions
Section titled “Step 7: Configure Policy Actions”Each policy can take one or more actions when its conditions are matched. Actions are grouped into two tiers:
Base action (required — select one):
| Option | Effect |
|---|---|
| Ignore | The event is discarded and nothing is recorded |
| Log | The event is recorded in the database but no alert is raised |
| Log and Alert | The event is recorded and an alert is raised, appearing in the Alerts list |
Additional actions (available when “Log and Alert” is selected):
| Action | Effect |
|---|---|
| Requires Audit | Marks the alert for audit review; assigns an audit status and requires an investigator to review and close the alert |
| Sends an email notification when the alert is triggered. You can choose to use global alert recipients, the store’s location-based recipients, or a specific list of email addresses. | |
| Send to Telegram | Sends a Telegram message alert to configured chat IDs. Requires a Telegram integration to be set up on the account. |
| CCTV Video | Instructs the on-site CCTV agent to capture a video clip from the associated camera at the time of the event. Lead-in and lead-out durations are configurable. |
| AI Labeling | Applies AI-based object classification to the captured CCTV footage. You configure the label type (Person, Car, Indoors, or Outdoors) and the minimum count required to confirm the alert. |
| Linked Events | (Available on policies with a lookback filter.) Retrieves CCTV clips from earlier linked events that relate to the same camera or till. |
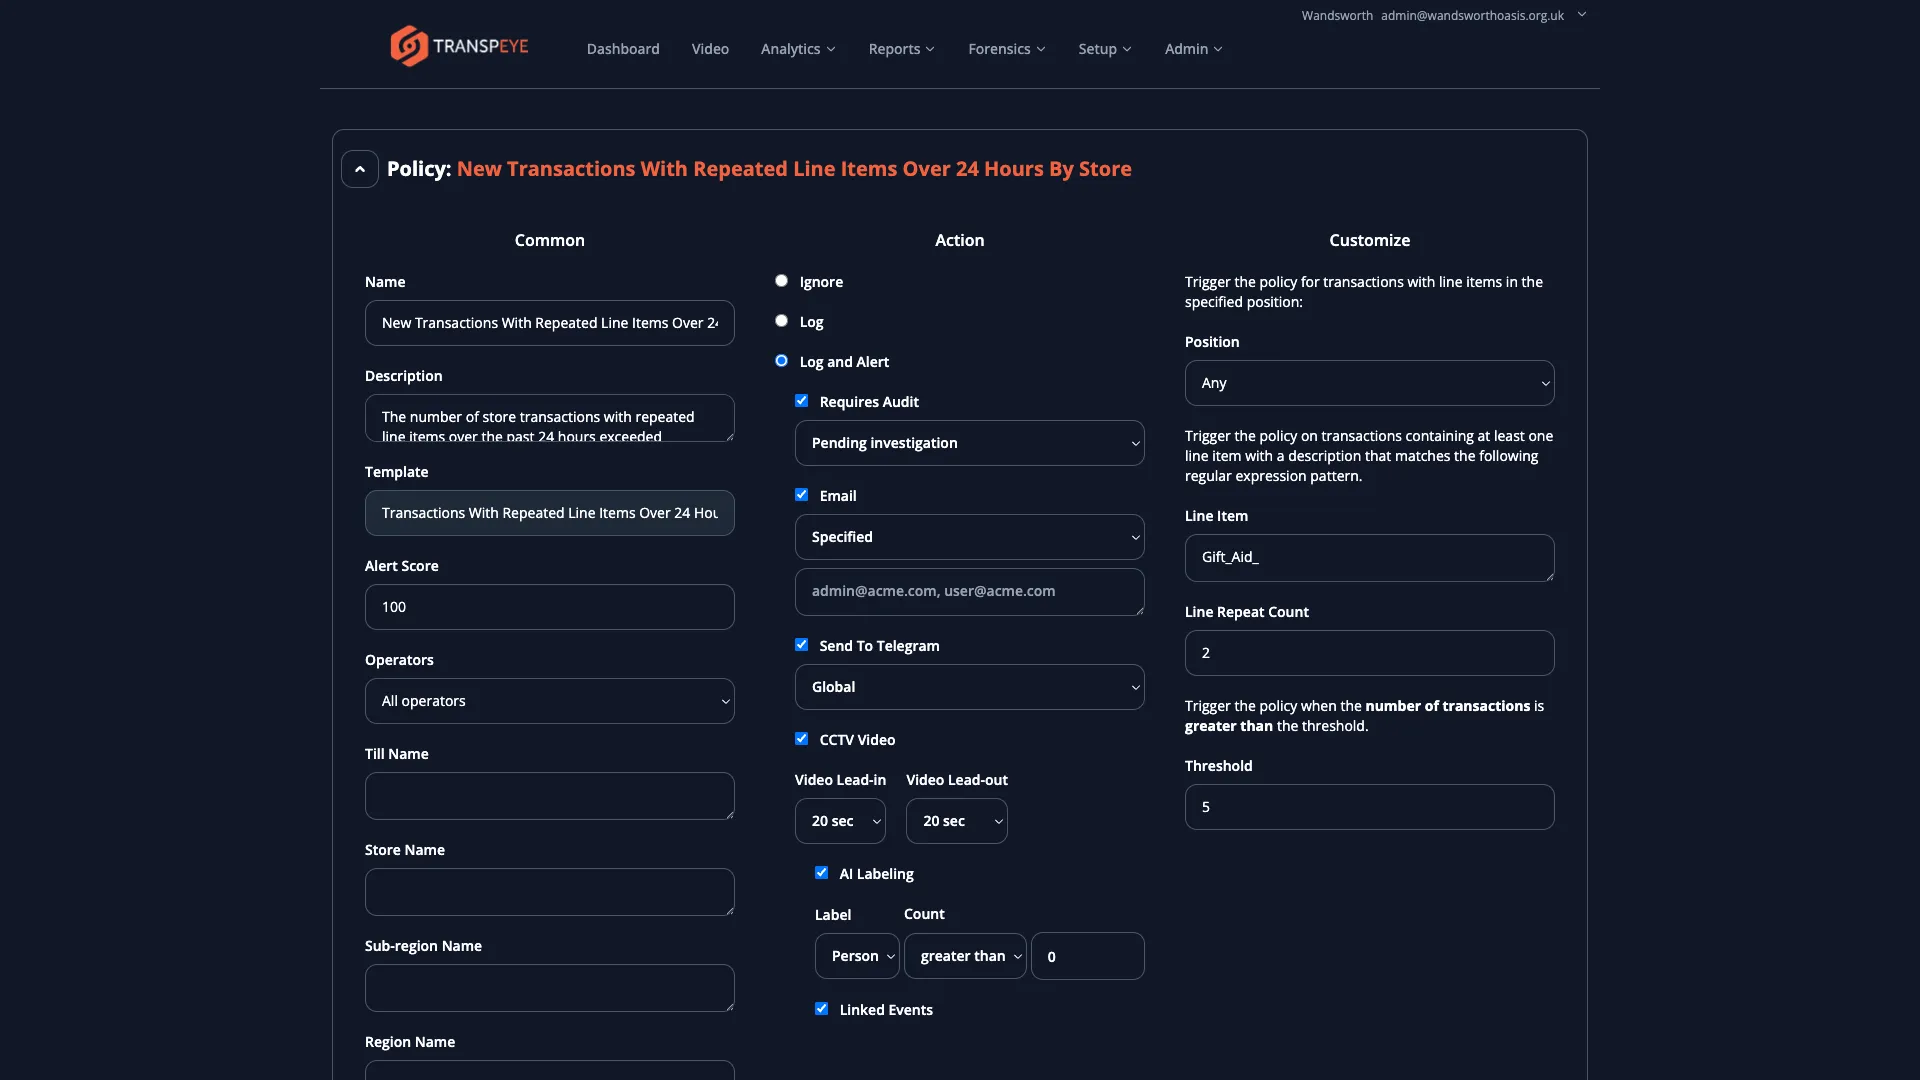
Step 8: Set the Policy Score
Section titled “Step 8: Set the Policy Score”In the policy editor, set the Score field to a numeric value representing the severity of this policy. The score is added to the cumulative alert score visible on the dashboard and in analytics views. Use consistent scoring across your policies to maintain meaningful aggregate scores (for example, 1–5 for low-severity policies, 5–10 for medium, 10+ for high).
Step 9: Save the Policy
Section titled “Step 9: Save the Policy”After configuring all conditions and actions, click “Save” to save the policy. It will appear in the policies list. If you enabled it during creation, it will immediately begin processing incoming data.
Step 10: Edit an Existing Policy
Section titled “Step 10: Edit an Existing Policy”To edit a policy, click the policy name in the policies list. The policy editor opens with the current configuration pre-populated. Make your changes and click “Save” to apply them.
Step 11: Delete a Policy
Section titled “Step 11: Delete a Policy”To delete a policy, hover over its row in the policies list to reveal the action icons, then click the delete (bin) icon. Confirm the deletion when prompted. Deleting a policy removes it permanently. Historical alerts generated by the policy are not deleted.
- Disable before deleting. If you are unsure whether you still need a policy, disable it first and monitor whether this affects your alert volumes. This is reversible; deletion is not.
- Use scoring consistently. Assign scores according to a clear scale across all policies so that the aggregate scores on the dashboard and in analytics views are meaningful and comparable.
- Place high-priority policies at the top. If you have policies that should take precedence (for example, a policy that ignores a specific operator’s activity), place it above other policies that might otherwise match the same events.
- Test with Log before enabling alerts. When creating a new policy, set the base action to Log initially and monitor whether it captures the expected events. Upgrade to Log and Alert once you are confident the conditions are correct.
- AI Labeling requires CCTV to be enabled. The AI Labeling action only has effect if CCTV Video is also selected. AI classification is performed on the captured footage.
Troubleshooting
Section titled “Troubleshooting”| Problem | Solution |
|---|---|
| A policy is not triggering alerts | Confirm the policy is enabled (checkbox is checked). Verify the conditions — the threshold or filter may be set too restrictively. Check that the agent is online and sending data. |
| Alerts are firing unexpectedly | Review the policy conditions. The amount threshold may be too low, or the time range may be broader than intended. Consider raising the threshold or narrowing the time window. |
| The Add Policy button does not create a new policy | Ensure you have selected both a Device Type and a Policy Template before clicking Add Policy. |
| CCTV clips are not being captured | Check that the CCTV action is selected in the policy and that the on-site CCTV agent is running and connected. Also confirm that cameras are mapped to the relevant tills. |
| Email alerts are not being received | Check your spam folder. Confirm that the alert recipient email addresses are correctly configured on the account under Admin > Configuration. |
| The Policies page is not accessible | Your user role does not include setup permissions. Contact your administrator to request the necessary access level. |